Long time, no post! It has been a whirlwind of a year. As I write this, we are having a spring snowstorm. There's nearly a foot of snow outside the window! Such is springtime in the Rockies...! :)
We are looking forward to getting out there on the trail soon and seeing friends and new faces, too! Here is a look at our Timberline Adventures schedule for this season (as of 4/6/13).
May: Grand Canyon/Zion hike
June: Northern NM bike tour, Columbia River Gorge hike
July: Volcanoes North & South bike tours
August: Beartooth hike, Glacier Park hike
September: Yosemite hike, Rogue River Wilderness hike (NS), Bryce/Zion (SM)
October: Grand Canyon
November: Chiricahua/Sonoran Desert hike (a really neat hiking tour near Tucson)
Hope to see you out there!
Tuesday, April 9, 2013
Wednesday, March 28, 2012
Photo Tips, Part 2
Hiking in a Tour Group with your Camera - Part 2
This is Part 2 of an article about taking pictures on a
guided hike. This Part focuses more on
the use of your camera and some of its settings. If you haven’t already read Part 1, I suggest
you do that first.
Before the Trip
Begins When you
are reviewing the camera’s manual make notes about anything interesting or
confusing and try to resolve them before the trip. Even if you have taken pictures with your
camera before, do some practicing before the trip, especially if you discover
some new features that you want to try.
Download and review your practice shots to your computer. It is very hard to tell what they will look
like by reviewing them on the camera’s small screen.
While you are thinking about equipment, make sure you have
at least one spare battery and enough memory cards (they are cheap at home but
expensive and hard to find a most great hiking locations). The batteries should be charged and the
memory cards should be blank and formatted in your camera. Be sure to pack your camera, extra lens,
batteries, battery charger, memory cards, and owners manual in your carry-on
luggage. I also pack two tri-pods, one
full sized and one very compact. I do
not usually carry the full-sized one on long hikes. They are very handy for night sky pictures,
sunrises, sunsets, and waterfalls. If
your camera came with cables, bring them.
You can use these to review your pictures each evening on a PC or TV.
Before my trips I like to search the web for pictures taken
in the area that I am about to hike.
This lets me know what other found interesting. Now let’s hit the road. The road to the airport that is.
On the Plane
While you are on the airplane, most of you will have to change the time
on your watch to match that of your destination. This is a good time to change the clock in
your camera. I am sure you remember how
to do this from reading the manual. This
is important since the time and date are embedded in your pictures. I file my pictures by date within a
trip. It can get very confusing if the
time in the camera is wrong. Hawaii is
six hours different than the east coast during daylight-savings time. This can put pictures taken in the evening in
the next days’s folder. Since you have
the camera out, lets also set the file type and size for your pictures. Most people will want to shoot large sized JPEG files. This creates big files that can be enlarged
or cropped to make your pictures even better.
Since you have those extra memory cards, the size should not
matter. If you are really into
photography and you are going to individually process each of your pictures,
you might consider Camera RAW. If that
is the case, you are not likely to be reading this article. While you are setting up your camera, see if
you can turn off automatic flash. Flash
is only effective for about 8-10'. Most
of the time it causes more problems than it solves. If you are indoors or in a dark space, you
can turn on the flash if needed, but remember its limited range. Review the results and turn the flash back
off. Under Camera Settings below I discuss more adjustments you should
consider, but first let’s talk about taking pictures.
On the Trail
Some cameras take a long time to power-up and you can miss shots waiting
for the camera to wake-up. Most cameras
do not use a lot of power when on. If
this is the case with yours, you can leave it turned on. Watch your battery life. If it goes down quickly, you will have to
turn the camera on and off. This may
cause you to miss some shots, but a dead battery would be worse.
When hiking, be sure to take pictures of signs. These will help you remember names. However, you do not normally want signs in
your regular pictures. Zoom in or move
to keep the sign out of your final shot. In Part 1of this Article, I talked
about having a Plan. Plans are great, but keep your eyes open. In addition to the great scenery, look for
small details like leaves, flowers, birds, and patterns in the rocks. If it fits your plan, capture details of the
trail. Is it steep, muddy,
snow-covered? Including people in these
shots helps capture the nature of the trail.
Composing your pictures properly before you take them is
very important. You can do some cropping
after the fact on your PC but you can’t add anything or change the
perspective. Avoid the tendency to walk
up to a scene and take the shot from the same place everyone else uses. Okay, take that shot, but then move
around. Look for better vantage
points. Get higher, get lower, or move
closer. The first view point is seldom
the best. Once you get to your vantage
point, look at the scene. What do you
see? What is good and what is a
distraction? What will be your focus of
attention? What do you want in the
foreground, the background? Now compose
the shot in the camera. Getting the
right foreground is very important and often overlooked, especially with zoom
lenses. Foreground objects help
establish the picture and give it scale.

(Picture 3, Kapaa, Hawaii, including the beach in the foreground
improves this shot)
While on the trail, if you see any thing interesting take
the time to photograph it. Don’t be in a
hurry to get to the end of the trail and don’t tell yourself that you can get
the picture on the return. Hopefully,
the hike will be a loop and not an out-and-back. Even if you return the same way, the view
will have changed. The rain will have
started or stopped, the sun or clouds will have moved. If the shot improves on your return, take another
picture. Be sure to look back as you
hike. Often the best views are behind
you. Actually, stop hiking before you
look back. Since I mentioned rain, lets
talk about rainbows. Is this the silver
lining or what? As you know rainbows
often appear after rain or when it is raining in the distance. There were a lot of rainbows in Hawaii. Okay there was also a lot of rain. What you may not know is that polarized
sunglasses can obscure rainbows depending on the angle of the light. When rainbows are possible, take your
polarized sunglasses off to check. If
you see a rainbow think about the foreground.
A picture of a rainbow by itself is okay, a rainbow picture with the proverbial
pot of gold (or interesting formation, lake or mountain) under it can be
great.

(Picture 4, Waimea Plantation
Cottages, Waimea, Hawaii, works better
because of the old cottage.)
Review your pictures often.
Don’t wait till the end of the week to find out you forgot to set
something correctly. Try to look at the
camera’s screen after each picture. If
you find a mistake at that point, you can retake the shot. If it is to bright to see the screen, you
might have to look for some shade. Also,
review them all at the end of each day.
Use a PC or TV if possible. Those
cables you packed will help. This will
let you see if something is not right with your camera settings or
technique. See if your pictures match
your plan.
Keep an eye on your battery charge status and the number of
shots left on your memory card. Change
them before they are completely exhausted and be sure to recharge the
battery. You don’t want either to fail
when something interesting is happening.
I love wild animals shots and hate to miss any because the memory card
is full or the battery died as the moose walks passed. Always carry the camera ready for shoot.
Cameras Settings
Okay, I could have covered camera settings earlier, but I knew you
wanted to think about hiking. Lets
discuss settings a little now. I can’t
go into all of the setting on your camera, there are just too many. Most cameras have some form of a mode
adjustment. One setting is usually Program. This is a good place to leave your camera
while hiking. If you have only a second
to take a picture of the bear before both of you start running, the Program mode will get the
picture. You can also use the Auto mode. That gives you less control of the camera
settings but works for most shots.
(Okay, you should not run from the bear, but that is outside the scope
of this article.) When you have time,
experiment with Aperture and Shutter (sometimes T) priority modes depending on
the shot . Aperture gives you control of depth of field (what is in
focus). The higher the aperture number
the greater the depth of field. If you
want to blur the background use a lower numbered aperture.

(Picture 5, Volcano Village, Hawaii, demonstrates a shallow depth of field.)
If you want the foreground and background in
focus, use a higher number. Shutter (or T) priority mode lets you freeze or blur action. If you are going to blur action, say a
waterfall, a tripod would come in handy.
If one is not available, carefully sit your camera on a rock, post, or
your backpack.

(Picture 6, Zion National Park, Utah, blurred the water with a long
shutter speed.)
Use the self timer to avoid shaking the camera. Be sure to switch back to Program or Auto mode or you may mess up your next shot.
Most point-and-shoot cameras have digital zoom
capabilities. If you plan on cropping
your pictures on a PC after the trip, I suggest you turn off the digital
zoom. The computer will do a better job
of enlarging the picture than the digital zoom on most cameras. However, if you do not plan on cropping, turn
on the digital zoom feature. Be aware of
the fact that picture quality goes down as the digital zoom power is
increased. When possible, zoom with your
feet (get closer). As a general rule,
most people do not get close enough or zoom in tight enough. Fill the frame with your subject unless the
surroundings are important.
Let’s talk about ISO for a second. The lower the ISO speed set on your camera
the better the quality of the pictures.
But in low light, especially without a tripod, or in fast-action
situations, you will need a higher ISO (say 1200-1600) to get a sharp
picture. If you are hand-holding the
camera the shutter speed should equal or exceed the power of the lens. If you are taking a normal close range
picture then a shutter speed of 1/60 of a second should be okay. But if you are using a telephoto or zoom lens
that really pulls the scene in close a speed of 1/200 of a second or faster may
be needed to avoid blurring the picture from camera movement. Many cameras have built-in lens
stabilization, but that only helps a little.
In general, you should keep the ISO low (i.e. 100 or 200) unless you
need more speed in weak light or fast action situations. If you change the ISO, be sure to reset it to
the lower number for your normal outdoor shots.
If your camera allows you to adjust White Balance, it can usually
be left at Auto. Cloudy
is another good option for most outdoor shots.
Try both and see which you prefer.
If you are shooting indoors with flash, you should stitch to Flash white balance. If you are indoors without flash, Tungsten or Fluorescent white balance are available as needed. Again, be sure to switch back to Auto or Cloudy.
Some cameras will reset some of your settings to the default
when the camera is powered off. If this
is happening, see if you can disable that feature. If not, you may need to make the important
adjustment each time you power on. In Program mode, hopefully, most of
your settings should remain.
On the flight home, when you reset your watch, reset the
clock in the camera.
Okay, I could go on for another dozen pages, but we would
have all lost interest by then. Let’s
sum it up. Prepare in advance. Know your equipment and practice. Have a plan, but be flexible. Take lots of shots. Keep the camera ready to shoot. Review your work often.
I want to thank Nola for the chance to write this article
and you for reading it to the end. Have
fun on the trail.
Bernie
Many thanks to Bernie M. for his great tips on taking better photos on the trail. Thanks for visiting Guide 2 Hiking!
Tuesday, March 27, 2012
Photo Tips, Part 1
Here are some camera tips for the trail from guest blogger, Bernie M. This is the first of a two-part series. The first part discusses some general guidelines while the second part talks gets into more technical information about camera settings, etc. Enjoy!
Hiking in a Tour Group with your Camera - Part 1


Hiking in a Tour Group with your Camera - Part 1
I recently returned from a week of hiking in Hawaii on a
tour created by Timberline Adventures.
One of our guides was Nola the host of this Blog. During the trip it was hard for Nola not to
notice all of the camera gear I was lugging around most of the time. After the trip, Nola asked if I wanted to
write an article for her Blog about taking pictures while hiking with a group. That was all of the encouragement I needed.
We ended up with a two part article. In Part 1 I am going to focus on taking
pictures on a guided hike similar to the one in Hawaii. Here you have a group of say 5-10 hikers, and
one or more guides. The hikers will have
different interests and hiking abilities.
However, one thing is for certain, none of them will want to spend very
much time waiting for you to take pictures.
If you want to come home with some great shots and some new friends, you
need to do some preparation and keep some thoughts in mind during the hikes.
Before the Trip
Begins Let’s assume you will be using something
between a cell phone and digital single lens reflex camera to record your
trip. The approach is the same, the
complexity and flexibility increases as you move up the spectrum of
cameras. For starters, make sure you
have the camera well before the trip. Do
not run out and buy a fancy new camera on the way to the airport. You need to be familiar with your equipment,
and not trying to learn how to use it on the flight. Even if you have read the camera’s manual
before, it is a good idea to read it again with a focus on how various features
may come in handy during this trip.
Being familiar with your camera will not only help you take better
pictures, it will allow you to take those pictures faster.
Now let’s think about what you are going to do with these
pictures. Do you want: 4"x6"
prints; pictures to upload to the web; or to create a photo-book? What do you want to capture in your photos:
the spectacular scenery that made you chose this trip; the group experience
afforded by your fellow hikers; the local flowers; all of the above? Thinking about this in advance is better than
getting home and wishing you had taken more pictures of people, flowers, or the
views. Pictures with digital cameras are
almost free once you own the equipment.
When in doubt, shoot, think, and shoot again. However, remember you are going to be with a
group most of the time and therefore, you are not going to have the flexibility
to set up a tripod and experiment with a lot of different camera settings or
view points.
On the Trail
Okay, it is day one and you are ready to start hiking. Look at your camera and make sure all of the
settings are correct. Do this at the
start of each hike. Be sure your camera
is easy to get to before you hit the trail.
Don’t put it away in a backpack or some other hard to reach
location. If you get to a tricky part of
the trail, like a river crossing or steep descent, store the camera in such a
way that it won’t get damaged and your hands are free.
You already created a picture plan before the trip, now take
shots that match that plan. Composing
your pictures properly can make the difference between an okay shot and a great
shot. If you have to wait for people to
move out of frame, be thinking about how to improve the shot while you
wait. But you can’t wait too long, your
fellow hikers will be ready to move on.
Besides, sometimes people in a shot help show scale and interest. Take other candid pictures of your fellow hikers if that fits your plan. A few group shots are nice, but catching people in action is more fun.

(Picture 1, Sleeping Giant, Kauai, demonstrates
how including people shows the
difficulty of the trail.)
Keep an eye on your fellow hikers. When possible hike near the front of the
group. People in the front are most
likely to see and photograph any wildlife. Being in the front also allows you
more time to compose your pictures. When
everyone stops to regroup, be sure to be one of the first to restart. If you find yourself near the end of the
group move faster. Watch to see what the
others are photographing. Are you
missing something or some unique perspective?
When you see someone with a fancy camera lying on the ground looking up
or in some other unusual position, try to figure out what is going on. Don’t be afraid to ask what they were doing
after they finish the shot. Most
photographers like to share their ideas.
If you like, have people take pictures of you with your camera. Don’t assume they know what you want in the
frame. Set up the camera, compose the
picture, and then once you step into the picture, they just need to press the
button. Explain which button, if it is
not extremely obvious.
On most trips you will have some free time in the mornings
and evenings other than meals. At the
end of the day, be sure to consider taking some night sky pictures. If you are from the east coast, you may have
never seen the Milky Way. In many of the
parks in the southwest it is often visible.
Your camera may have a night sky setting. Remember reading that in the
manual? Give it a try. A tripod is almost a necessity. A small one will work in this situation. Get as far away from lights as possible and
wait for a clear night. Try to avoid the
moon, it obscures the stars. You are on
your own time and you can experiment.

(Picture 2, Big Bend National Park, Texas, taken with a tripod, shows
the night sky, with the mountain in the foreground.)
Even before the night sky pictures, don’t
miss the opportunity to shoot the sunset.
This is often a problem when traveling with a tour. Most tours like to eat dinner around
sunset. Nothing says you have to eat
dinner. If giving up a dinner you
already paid for doesn’t work for you, try for sunrises. That just means getting up early and maybe
missing breakfast. Again a tripod helps.
Be sure to experiment with items in the foreground with night sky and
sunrise/sunset pictures. Review your
pictures and try again tomorrow if necessary.
I joked about missing meals, but this is a somewhat serious
concern. Most professional photographers
believe that the best time, perhaps the only time, to take pictures is about an
hour before until an hour after sunrise and sunset. The light during the day is less than
ideal. This is a price you have to pay
when traveling with a hiking group. If
you like the place you can return on your next trip to capture those pictures.
Before the trip ends, I like to exchange email address with
the members of the group, including the guides.
That way you can share your pictures and see theirs. Posting your pictures on the web is very easy
and you can send individual shot to your fellow hikers. Have fun and start planning your next hiking
trip. Keep an eye on Nola’s Blog for ideas
about places to visit.
Bernie
Friday, March 23, 2012
Bucket List Hike: Preparation for hiking the Grand Canyon
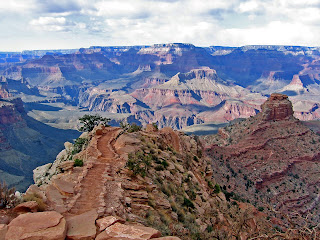
One of my favorite views: Above Cedar Ridge, South Kaibab Trail
"A journey is a person itself; no two are alike. And all plans, safeguards, policing, and coercion are fruitless. We find after years of struggle that we do not take a trip; a trip takes us." -- John Steinbeck, in Travels With Charley
That quote from Steinbeck is one of my favorites. Thus, the first thing I like to open a hiking tour orientation with is saying: Be flexible. We may come to trips with prior expectations, thinking we know what a trip is going to be, setting ourselves up to be disappointed with something that just isn't how we imagined it. Be present/flexible and you'll be more likely to be rewarded with an enjoyable experience you may have missed otherwise.
So what do huge vistas, California condors, geologic wonders of the world, mule pack trains, tired legs, and the best bacon you have ever eaten have in common? They are all possible things you may see or experience when hiking down into and back out of the bottom of the Grand Canyon & Phantom Ranch.
It is recommended to do this hike over two days. Hike down the first day, spend the night at either Phantom Ranch or Bright Angel Campground (reservations required well in advance for both), then hike out the next day.
Being flexible is definitely recommended for enjoying your hike into/out of the Grand Canyon. The trip definitely "takes you". No two trips are alike. Your first trip? Prepare yourself** and you'll be primed to enjoy your journey more.
Train your body. This is not a beginner's hike. Try hiking in Zion first if you haven't spent time in the vertical world of canyons. Even if you don't have hills where you live, spend time climbing stairs or the stairmaster at the gym. You're spending most of your hike descending (or ascending) nearly 5000 vertical feet (or more, from the North Rim). Your quads, hamstrings, and feet will thank you later (or you'll be a case of "Kaibab Crawl").
Know your limits. Recognize that if you hike down into the canyon, you will need to hike back out. No, you can't book a mule ride out at the last minute. Terrified of heights? Try Zion first. Wait until you have experience and confidence to undertake this amazing hike.
Use hiking poles. IMHO, hiking poles were made for the Grand Canyon. You'll be hiking on steep, rocky, eroded paths. I find hiking poles help to save quite a bit of fatigue in my knees and quads on the descent. They also enable me to use my arms to help push up "tall people steps" on the ascent.
Take "Full Meal Deal" breaks. This means take a break every hour to 90 minutes. Take off your pack, put your feet up, eat a snack, drink some water (or electrolyte replacement drink). This doesn't mean you have to take a half hour break. Five to ten minutes will do. Keep yourself hydrated and eat to sustain energy levels.
Start early. If you're staying at Phantom Ranch, this shouldn't be a problem. They wake you up at 4:30 a.m. for a 5 a.m. breakfast! (Mmmm, I can smell the bacon now...!) We usually head out around 6 - 6:15 a.m. to beat the heat and give us plenty of time to enjoy the trail.
Be prepared for the weather. With a 5000' descent/ascent, you'll find at any given time a temperature difference of ~ 3 degrees per 1000'. Add the time it takes to hike down/up, and depending on the time of year, you could experience a 50 degree temperature difference (or more). Spring & fall on the trail are usually the most user-friendly times to go. Check out the GCNP weather page here.
Address "hot spots" immediately. If you are feeling a hot spot or blister developing, don't wait. Pull over and tape or moleskin that hot spot. Distracting pain can make the hike a lot less fun. Trim toenails ahead of time, too. (Check out the posts on blisters here & here if you want more info.)
It is what it is. This means that the Grand Canyon, and especially the inner canyon, is an isolated place. Phantom Ranch is quite civilized for where it is located. It has running water and showers (except when they work on the water lines). It has cabins with bunk beds, linens, and towels. (Bring earplugs!) They have set meal times and menus that have to be booked in advance. Make sure you appropriately plan your lodging or meals or hike with a group that plans for you. Everything is delivered by mule train, even the mail! If you have special dietary needs, bring what you need with you.
Don't get Psyched Out. Put one foot in front of the other on the way up. You'll get there! A tip: You'll be able to track your progress if you look back at where you've come from, not how far you have left to go.
So train, pace yourself, eat, hydrate, start early... do all those things and you'll be stylin'! Remember, there's ice cream at the Bright Angel Lodge less than five minutes from the Bright Angel Trailhead on the South Rim...! You deserve it! ;)
More information:
- GCNP website here.
- A musical journey (my favorite parts of Grofe's Classical Grand Canyon Suite) here.
- Grand Canyon Natural History Association here.
- If you want to go hiking with Timberline Adventures, their website is here.

Near the bottom of South Kaibab Trail
** Note: No one can predict exactly what the Grand Canyon will present to you. This is a partial list and not a replacement for using common sense or good judgement.
Thursday, March 15, 2012


Wednesday, March 7, 2012
Spring Training...
Spring is in the air (at least when it's not snowing here in Colorado!). "Daylight Savings" returns this weekend which means maybe we'll have the chance to get outside after work. Unless you already train in the dark. If so, right on! But for the rest of us, the extra hour or two of daylight can be a big motivator. So what's it gonna be: "Big Bang Theory" reruns or a half hour walk?
Aside from winter gym cardio & strength training, what do you do to prepare for hiking season? What motivates you?
Here are a few thoughts:
As for my training, I intend to be back from my workout in time to watch "Survivor". :-)
Brief February Trip Notes:
We got back from hiking in Hawaii just over a week ago. Met some wonderful people, enjoyed hiking with some we already knew. Everyone seemed to have a good time!
Most of our mileage was not really huge because many of the trail surfaces can be quite challenging and time consuming. Thus, something that may appear to be "only" five miles can feel like twice that! Slow & steady hiking, good for balance. It gets dark relatively early as well. Snorkeling is to me a sort of "underwater hiking". We had one snorkel day per trip. I'm not much of a swimmer but enjoy all the colorful fish and coral. Snorkel Bob's and Pacific Whale Foundation actually have prescription masks you can rent that enable those of us who wear prescription lenses to see underwater! So cool!!
Pictures from hike to follow soon... please bear with me -- I put my camera's patch cord somewhere "safe"! :-(
Here's a link to Diana's trip report from Island Classic.
Aside from winter gym cardio & strength training, what do you do to prepare for hiking season? What motivates you?
Here are a few thoughts:
- Walk more on a daily basis.
- Start running/jogging for fitness.
- Sign up for an event, such as a 5K or 10K walk or run.
- Hike some local trails as they become snow free.
- Squeeze as many late season skiing or snowshoeing days in as possible.
- Sign up for a spring hiking tour and tough it out. (!)
As for my training, I intend to be back from my workout in time to watch "Survivor". :-)
Brief February Trip Notes:
We got back from hiking in Hawaii just over a week ago. Met some wonderful people, enjoyed hiking with some we already knew. Everyone seemed to have a good time!
Most of our mileage was not really huge because many of the trail surfaces can be quite challenging and time consuming. Thus, something that may appear to be "only" five miles can feel like twice that! Slow & steady hiking, good for balance. It gets dark relatively early as well. Snorkeling is to me a sort of "underwater hiking". We had one snorkel day per trip. I'm not much of a swimmer but enjoy all the colorful fish and coral. Snorkel Bob's and Pacific Whale Foundation actually have prescription masks you can rent that enable those of us who wear prescription lenses to see underwater! So cool!!
Pictures from hike to follow soon... please bear with me -- I put my camera's patch cord somewhere "safe"! :-(
Here's a link to Diana's trip report from Island Classic.
Monday, January 23, 2012
Exposure Exposed!
Does the thought of hiking a ridge or along a canyon wall or mountainside leave you feeling uncomfortable? Are you "afraid of heights"? And does this affect where you can choose to go to hike?
Quite a few people I've met over the years seem to be somewhat uncomfortable with exposure. The reasons are many: fear of falling, tripping, going over the edge; the perspective of looking down of something higher up, getting vertigo, and more... all valid reasons for feeling uneasy, for sure!
Here are a few ideas that may help you in taking that next step towards eventually taking that bucket list hike down into the Grand Canyon (or other trails that have edges, ledges, or heights):
Watch and concentrate on your footing. This does not mean that you can't stop to look at the scenery. However, on exposed areas, it may help to stop, hold on to something (like a canyon wall, for example), assure your balance, then take in the view rather than try to hike & take pictures at the same time.
Walk on the side that is protected, if there is one. (see Zion picture below) Often there are exposed areas only on one side of the trail. While you don't have to "hug" the wall, walking to the protected side may give an added sense of security.
If you are doing a "cable" route, such as Angel's Landing (Zion) or Half Dome (Yosemite), your best bet is to put the hiking poles away to have both hands available to hold onto the cable, rock, or wall. Note: Many cable routes have fixed posts or anchors which the cable can glide through. If there are other people holding onto the cable and they let go, the cable may move. If you are not expecting this, it could throw off your balance a bit. Look to see how the cables are attached so you know if this will be a possibility enroute.
Sometimes the perspective changes as you get onto the "exposed" areas. What looks like a skinny little path in the distance may actually be wider than you realize.
Often as hikers gain experience with a little challenge of exposure here and there, they gain the confidence necessary for them to enjoy a hike with more consistent exposure. That being said, exposure is not for everyone.
Please let me know if you have any other ideas that have worked for you. Good luck & stay safe hiking out there! :-)
Cedar Ridge on the South Kaibab trail, Grand Canyon NP
(This is a good spot to use hiking poles and watch your footing.)

Exposed rock cut on Observation Point hike, Zion NP
(Note the hiker walking on the more "protected" side of the trail.)
Exposed mountainside on Dawson-Pitimakin hike, Glacier NP
(Also a good place for hiking poles.)

Exposed ridge of upper Angel's Landing, Zion NP
(Trail goes along rock rib. Put poles away, use cables & rock to hold onto, note cables may move when someone lets go. Route is also wider than it looks from this viewpoint.)
Subscribe to:
Posts (Atom)